
In the realm of mobile content creation, visual fidelity is paramount. For Educators, Mobile Gamers, and YouTubers, the presence of a third-party watermark—such as the default branding found in recording utilities—compromises the professional integrity of the output. AZ Screen Recorder remains a top-tier industry standard due to its robust architecture, allowing for high bitrate recording (up to 60 Mbps) and frame rates reaching 120FPS on supported devices.
However, many users operate under the misconception that removing the default branding requires a premium subscription or complex “modded” APKs. This is factually incorrect. AZ Screen Recorder provides a native, built-in configuration to disable watermarks, ensuring your 1080p or 2K footage remains a “clean feed.” This article provides a technical deep-dive into configuring the rendering pipeline to eliminate overlays and achieve broadcast-ready results.
Understanding the Rendering Overlay
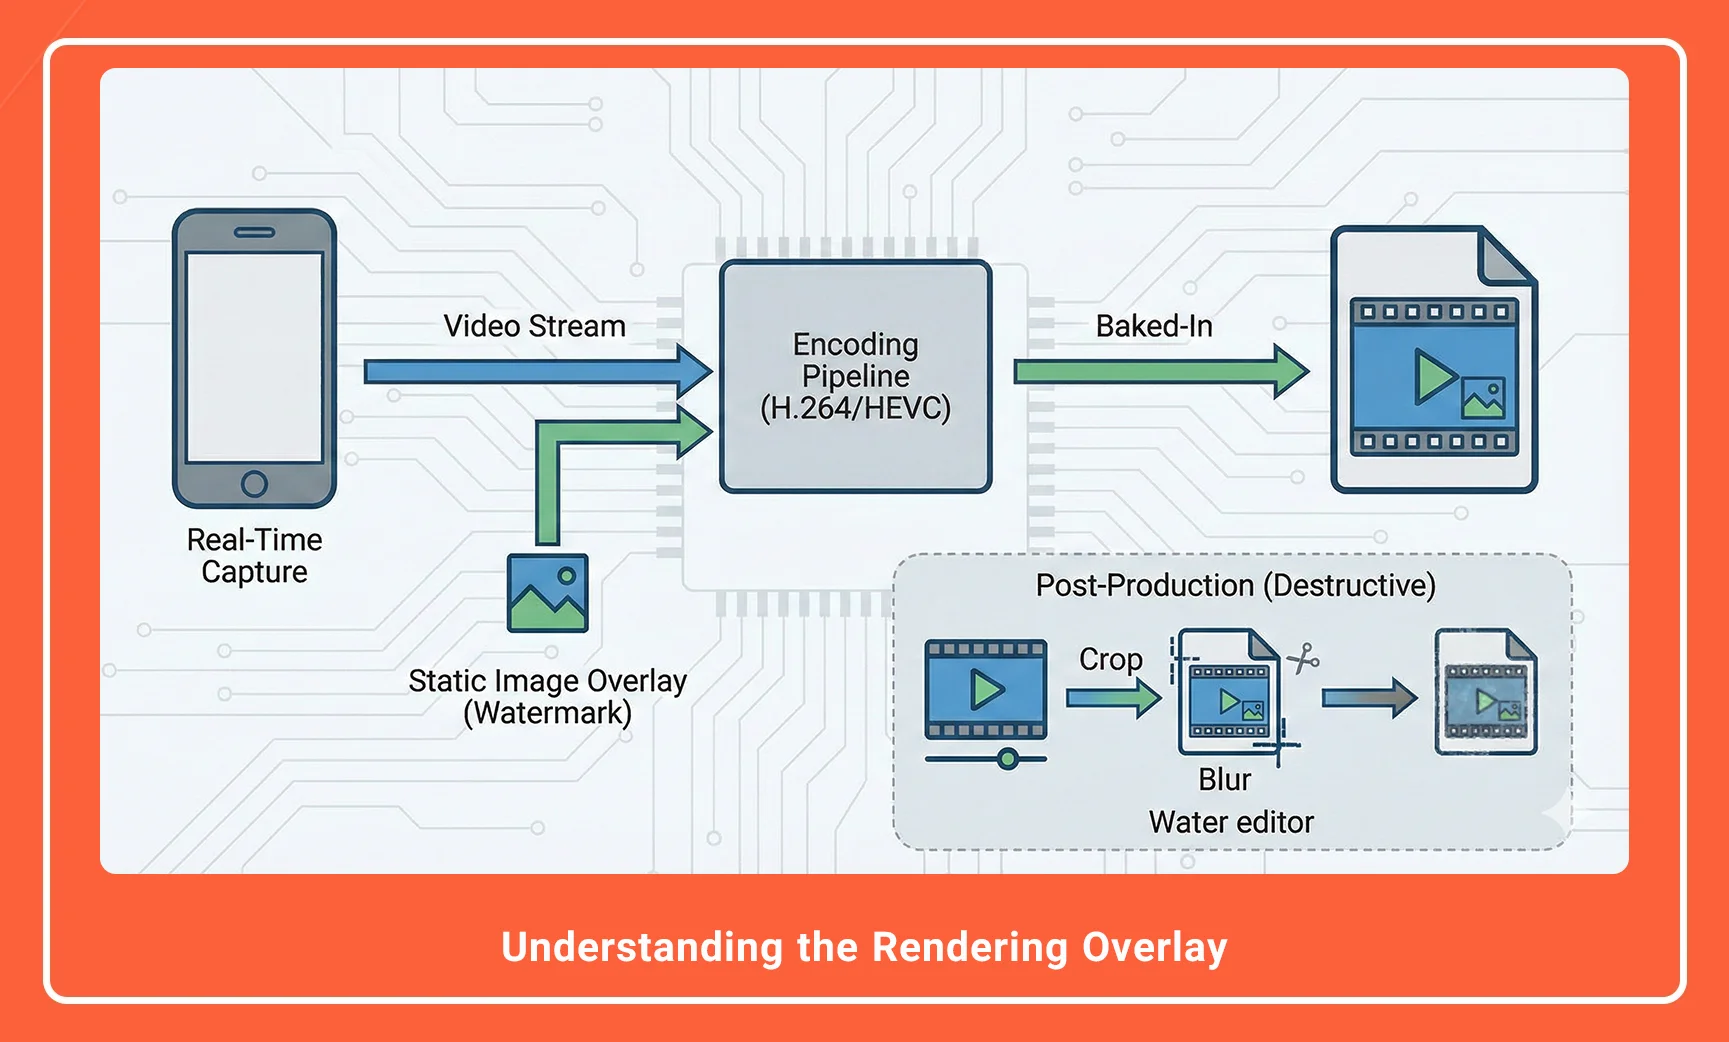
Before modifying the application, it is essential to understand how the watermark is applied. In technical terms, the watermark is a static image overlay injected into the video rendering pipeline during the encoding process (typically H.264 or HEVC).
Unlike post-production watermarks, this is “baked in” during real-time capture. Therefore, it must be disabled before you initiate the recording session. Once a video is encoded with the watermark, removing it requires destructive video editing (cropping or blurring), which degrades the pixel aspect ratio and overall quality.
- Description: A split-screen comparison image. The left side shows a mobile game recording with the “AZ Screen Recorder” watermark text overlay in the bottom corner. The right side shows the same frame completely clean and unbranded.
- Alt Text: Comparison of AZ Screen Recorder footage with and without watermark overlay.
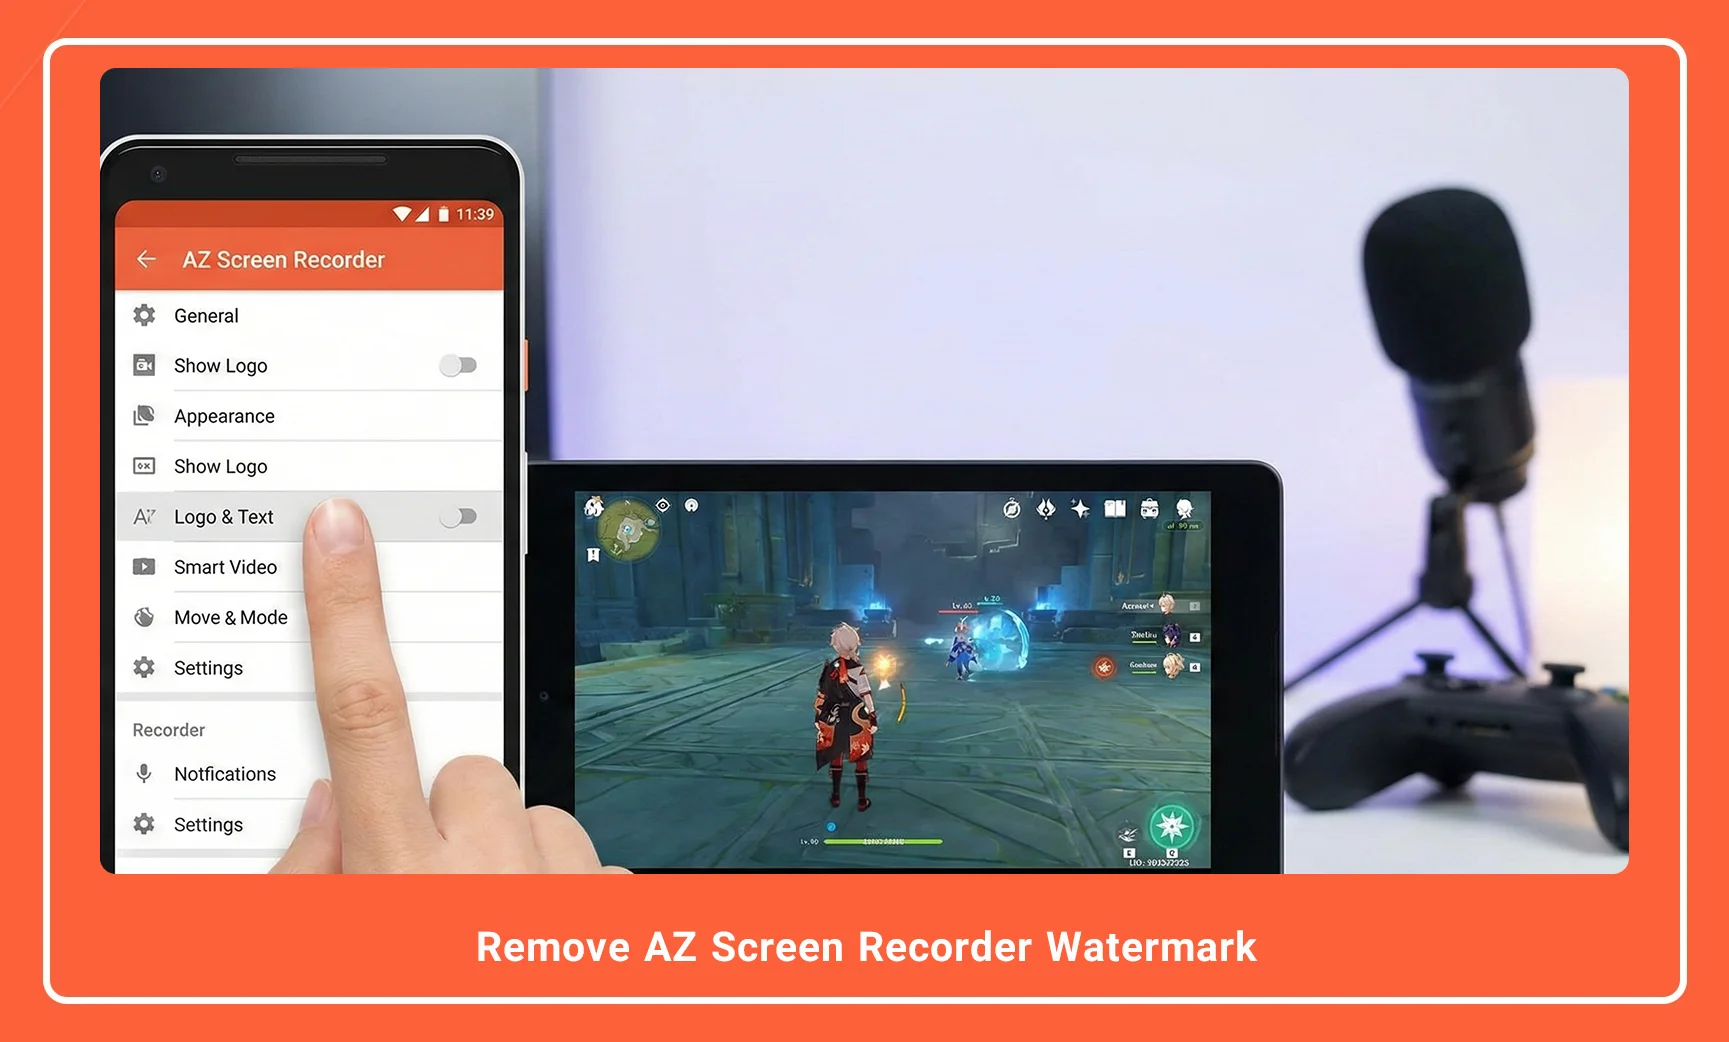
Method 1: Disabling Watermark via Settings (Free & Native)
The most direct method utilizes the application’s internal configuration menu. AZ Screen Recorder distinguishes itself from competitors by allowing free users to toggle the branding off without forcing a transaction.
Step-by-Step Configuration:
- Launch the Application: Open AZ Screen Recorder. Ensure the floating control bubble (overlay UI) is active.
- Access the Settings Matrix: Tap the floating gear icon or open the app drawer to enter the main interface. Tap the Settings (Gear icon) tab on the far right.
- Locate UI Options: Scroll down past the Video Configuration section (Resolution, Bitrate, Frame Rate) to the section often labeled Overlay Options or Text and Logo.
- Toggle the Switch: Find the option labeled “Show Text” or “Show Logo”.
- Disable: Switch the toggle from ON (Blue) to OFF (Grey).
Once this boolean value is set to false in the app’s internal logic, the rendering engine will bypass the overlay injection step, resulting in a pristine output file.
- Description: A high-resolution screenshot of the AZ Screen Recorder Settings menu, specifically highlighting the “Text and Logo” section with a red arrow pointing to the toggle switch being turned off.
- Alt Text: AZ Screen Recorder settings menu showing how to disable text and logo watermark.
AZ Screen Recorder Magic Brush: A Technical Guide to On-Screen Annotation
Method 2: Custom Branding for Professionals (Pro Feature)
While removing the manufacturer’s watermark is critical, professional creators often need to inject their own branding for copyright protection and channel identity. AZ Screen Recorder allows for Custom Watermarks.
This feature permits the insertion of a custom PNG or JPEG asset into the rendering pipeline. This is particularly useful for YouTubers who require a permanent channel bug or logo throughout the gameplay or tutorial.
Technical Specifications for Custom Watermarks:
- Format: PNG (recommended for transparency alpha channels) or JPEG.
- Resolution: Keep source files below 500×500 pixels to avoid memory overhead during encoding.
- Opacity: Adjustable slider (0-100%) to prevent obscuring critical UI elements of the app being recorded.
To access this:
- Navigate to Settings > Text and Logo.
- Select “Image”.
- Upload your asset from the device directory.
- Adjust the Size and Transparency sliders to ensure the overlay does not interfere with the visual hierarchy of your content.
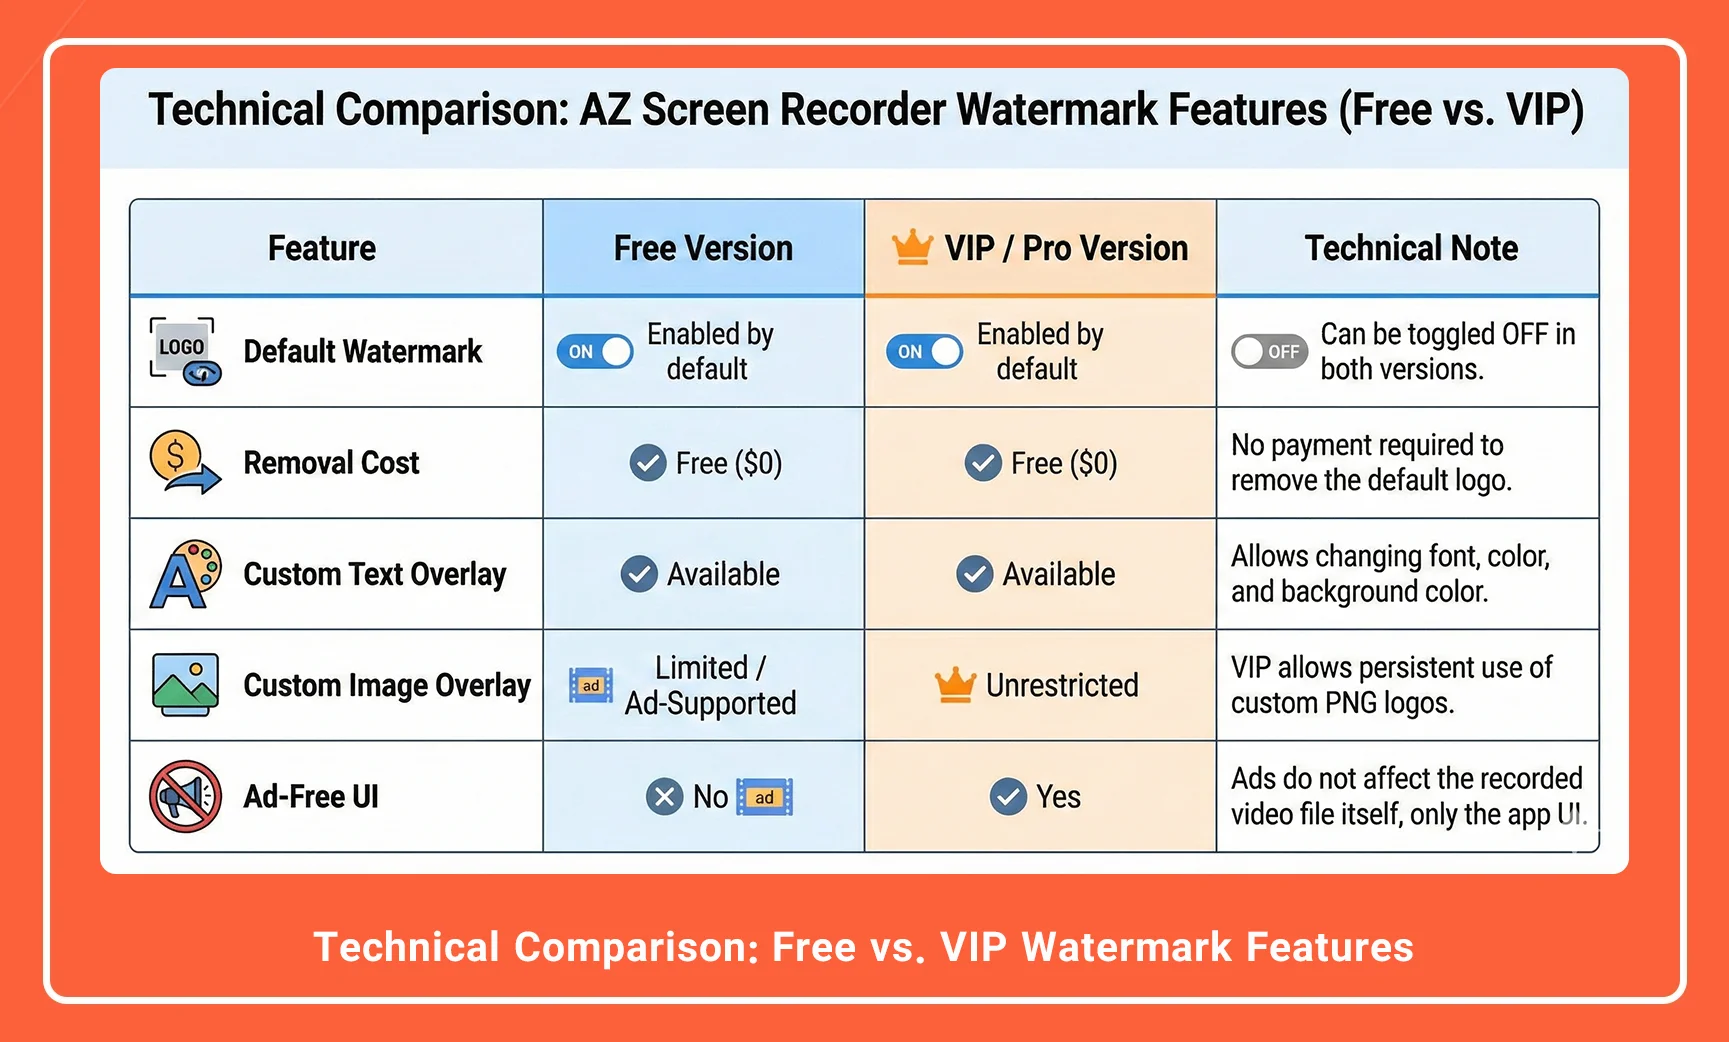
Technical Comparison: Free vs. VIP Watermark Features
The following table outlines the capabilities available regarding watermarking across different tiers of the application.
| Feature | Free Version | VIP / Pro Version | Technical Note |
| Default Watermark | Enabled by default | Enabled by default | Can be toggled OFF in both versions. |
| Removal Cost | Free | Free | No payment required to remove the default logo. |
| Custom Text Overlay | Available | Available | Allows changing font, color, and background color. |
| Custom Image Overlay | Limited / Ad-Supported | Unrestricted | VIP allows persistent use of custom PNG logos. |
| Ad-Free UI | No | Yes | Ads do not affect the recorded video file itself, only the app UI. |
- Description: An infographic showing the “Text and Logo” customization screen where a user is changing the font color and background size of a custom watermark.
- Alt Text: Customizing watermark text and logo settings in AZ Screen Recorder.
Conclusion
Producing high-quality digital content requires full control over the visual output. By navigating the AZ Screen Recorder settings and disabling the default overlay, users can instantly elevate the production value of their recordings from amateur to professional. Whether you are rendering a 1080p gaming clip or a 60FPS software tutorial, ensuring a clean feed is the first step in a proper post-production workflow.
Next Step: Open your AZ Screen Recorder app right now, navigate to Settings > Text and Logo, and ensure the “Show Logo” toggle is set to OFF before your next recording session.
AZ Screen Recorder Full Comparison With 16 Top Apps
Frequently Asked Questions
1. Does removing the watermark affect video quality or FPS?
No. Disabling the watermark actually slightly reduces the processing load on the GPU during the encoding process, as the engine no longer needs to render the static overlay layer, potentially improving stability.
2. Is the “No Watermark” feature permanent or do I need to disable it every time?
It is persistent. Once you toggle the specific setting to OFF in the configuration menu, the application saves this preference to the local storage, and it will remain disabled for all future recordings until you manually re-enable it.
3. Can I remove the watermark from a video I have already recorded?
No. The watermark is “baked” into the video frames during the encoding process. To remove it from an existing video, you would need to use a video editor to crop the frame or blur the area, which reduces quality.
4. Why does the watermark reappear after I update the app?
Major application updates typically reset local configuration files to ensure compatibility. If you update AZ Screen Recorder via the Play Store, verify your Settings to ensure the overlay preference hasn’t reverted to default.
5. Does the “Magic Button” feature leave a watermark?
No. The “Magic Button” is an invisible UI element used to control recording (pause/stop) via touch gestures. It does not render any visible pixels onto the final video output file.
AZ Screen Recorder is one of the most popular and powerful free and professional applications for screen recording on Android devices. Due to its ease of use, high output quality, and a rich set of features, this application has become a standard tool for gamers, educational content creators, and general users.